Blocks
Blocks are the basic unit for building notebooks. They can be used to query and process your data, or to present visualization and interaction tools to the user.

Types
There are three types of blocks:
- Python blocks: These will execute any Python code you write in them, and then display any output. You can use IPython commands. More information about this can be found in the IPython documentation.
- Markdown blocks: These will render any markdown you write into them and preview the changes live. You can use Markdown syntax. More information about this can be found in the Markdown documentation. If you hide the code of a Markdown block, you can double click the output to open the code area.
- Widgets: These will render different interface elements to provide a variety of features. More information about this can be found in the Widgets documentation.
By clicking on the appropriate button in the toolbar, you can create any type of block:

Actions
When you hover over a block, you will see a toolbar with some buttons on the top right. The main elements are:
- Execution stats icon [App mode only]: When a block has been executed, an icon is displayed to the left of the toolbar. The icon shows the status of the execution, and hovering over it will give you the execution statistics (elapsed time and completion date).
- Execute button: Button to execute the block.
- Move block up button [Scientific mode only]: Button to move the block up in the notebook.
- Move block down button [Scientific mode only]: Button to move the block down in the notebook.
- Show/Hide button: Button to show or hide the block's code area.
- Fullscreen button: Button to open the block's code area in fullscreen mode.
- Assistant button [Markdown and Python only]: Button to generate code for block using AI. See MINEO Assistant in this page.
- Gear icon button: Button to configure the block.
- Extra options button: Button to show additional actions, like 'Delete', Execute all blocks before' and 'Execute all blocks after'...
How to configure
When you hover over a block, you will see a toolbar with some buttons on the top right.
If you click on the Gear icon, you will see a menu with the following tabs:
- Widget [Widget only]: This tab displays the widget configuration form.
- Block: The block configuration form is displayed on this tab.
- Assistant : This tab displays an area where you can enter your question or suggestion for the wizard., or use one of the preset suggestions, such as Find errors. It will parse the code of the block you have focus on. See MINEO Assistant in this page.
- Comments: This tab displays the comments of the block. See Comments on this page.
- Information: This tab displays an area where you can enter useful information about the block.
To change the block Title, click on the edit button at the top of the page.
Block configuration
When you click on the Block tab, you will see a menu with the following sections in it:
- General:
- Hide block title bar: Whether to hide the block title bar.
- Execution: This section will display the execution configuration of the block.
- Execution priority (sequence): The order in which the block is executed. The lower the sequence number, the earlier the block will be executed. In scientific mode the sequence number is determined by the order of the blocks.
- Soft timeout (seconds): The maximum time in seconds that the block is allowed to execute.
- Output block format: The format of the block output. It can be
htmlandraw.
- Style Options: Various tabs for customizing the visual appearance of the block (described in detail in the Block Style Options section below).
Block style options
Block style options allow you to customize the visual appearance of blocks within your notebooks. You can style individual blocks through the block's settings, or set global styling for all blocks at the notebook level (via File > Properties > Block Style).
Formatting options
Basic formatting settings that affect text presentation:
- Font Family: Specify the font used throughout the block
- Font Size: Control the size of text within the block
- Formatting Type: Choose between display formats for content
Title styling
Customize the appearance of block titles:
- Padding: Control spacing around the block title (e.g., '0px 10px')
- Text Alignment: Position title text (Left, Center, Right)
- Background Color: Set the background color of the title bar
- Text Color: Set the color of the title text
- Font Family: Choose a specific font for titles
- Font Size: Set the title text size (in pixels)
- Font Weight: Control the thickness of title text (normal, bold, etc.)
Spacing options
Control padding inside blocks with the spacing panel:
- Top Padding: Space between the top edge and content
- Right Padding: Space between the right edge and content
- Bottom Padding: Space between the bottom edge and content
- Left Padding: Space between the left edge and content
Border options
Apply and customize borders around blocks:
- Border Style: Choose border type (solid, dashed, dotted, etc.)
- Border Width: Set border thickness
- Border Color: Choose border color
- Border Radius: Control corner rounding of blocks
Shadow options
Add depth and dimension to blocks with shadows:
- Shadow Color: Set the color of the shadow
- Horizontal Offset: Control shadow position horizontally
- Vertical Offset: Control shadow position vertically
- Blur Radius: Set how diffuse the shadow appears
- Spread Radius: Control shadow size
Background options
Customize the visual backdrop of blocks with several options:
Color background
- Solid color fill
- Opacity control
Image background
- Upload or select images
- Position control
- Size adjustments
- Opacity settings
Filter effects
- Apply CSS filters to backgrounds (blur, brightness, contrast, etc.)
Best practices for block styling
- Use consistent styling: Maintain a cohesive look throughout your notebook by using complementary colors and consistent spacing
- Consider readability: Ensure text remains readable by maintaining sufficient contrast between text and background colors
- Highlight important blocks: Use subtle styling differences to draw attention to key blocks
- Group related blocks: Use similar styling for related blocks to visually indicate connections
- Test responsive behavior: If your notebook might be viewed on different devices, test how your styling appears at different screen sizes
Hidden blocks
Hidden blocks work like any normal block, executing its code in the background, but the user does not see the block or its output.
Query widgets have no visual output, so you after configuring them you can mark them as hidden so that they do not affect your data app visually.
Set visible block groups
The set_visible_block_groups function empowers you to manage the visibility of particular block groups in your app.
To utilize this function effectively, first hide the block in App mode and designate a group name within the block properties. With this function, you can selectively reveal hidden blocks, enabling you to modify your app's layout on the fly.
Keep in mind that this feature operates exclusively in App mode and won't affect the scientific view, where blocks remain constantly visible.
Usage
from mineo_api import selectors
# For instance this will make both blocks tagged with 'group1' and blocks tagged with 'group2' visible
selectors.set_visible_block_groups(['group1', 'group2'])
Blocks panel
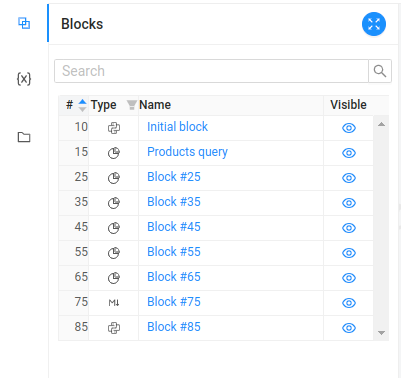
Inside your notebook's sidebar, you have a panel that displays a list with all its blocks. This panel has a fullscreen button that will open a bigger modal with the same list of blocks; a search bar to filter your blocks by title and then the table itself.
The table has the following columns:
- #: Sequence number of the block. By default, this column will be sorted in ascending order, in the sequence the blocks will run.
- Type: Icon showing the type of a block. It has a filter to show only blocks of a certain type.
- Name: Title of the block (by default, it will be
Block #<block_order>). If you click in a name, the notebook will scroll to the selected block. - Visible: Button to show or hide a block.
You can add different Markdown blocks with titles in the sections of your notebook, and then use them as a table of contents in your block panel.
Custom execution flow
Blocks within a notebook can be configured to follow a custom execution flow, allowing you to control precisely the order in which blocks run. This feature is particularly useful when you need a non-linear execution path, such as conditional flows or loops.
Configuring the next block
Each block can have a Next Block setting where you specify which block should execute after the current one completes. There are three options available:
-
Next block: The default option. Executes the next block according to sequence order.
-
None: Stops execution after the current block completes.
-
Custom: Allows you to manually specify the next block using either:
- A static block label
- A variable with dollar sign prefix (e.g.,
$next_block) to determine the next block programmatically, enabling dynamic execution flow
Define Next Block: Use the block configuration menu to set the Next Block field according to your workflow needs.
Test Your Flow: It's important to test the execution to confirm it behaves as expected and to ensure that there are no inadvertent cycles.
Key points to consider:
-
Assign Unique Labels: First, ensure each relevant block has a unique label for easy referencing.
-
Avoid Cycles: Ensure that your custom flow does not create cycles, as this could lead to infinite loops and will halt your notebook's execution.
-
Dynamic Flow Control: The next block field can reference either a static label or a Python variable prefixed with a dollar sign (e.g., $next_block). This allows the next block to be determined dynamically based on your code execution.
Example:
Suppose you have a set of blocks that need to execute based on the result of a computation. You can control this flow by setting the next block according to a variable:
# Example: Conditional execution flow
# In Block A, determine the next block based on a condition

result = some_function()

if result > 10:
    $next_block = "block_B"
else:
    $next_block = "block_C"
In this setup, if result is greater than 10, Block B will be executed next; otherwise, Block C will follow.
Use Conditional Logic: Leverage Python's conditional statements to set up dynamic flows.
Flow Visualization: Consider documenting or drawing your flow plan before implementation to avoid complexity and potential cycles.
By carefully setting up a custom execution flow, you can create a more efficient and logical execution path tailored to your notebook's specific requirements.