Worker, kernel and context
When you execute blocks in a notebook (or a pipeline), you are actually executing code in a worker. You can think of a worker as a virtual machine that gets created just to execute your notebook, and will be destroyed when you close it.
Workers
Workers have a life cycle tied to a notebook session: They get created when you open a notebook, and destroyed when you close it. When a worker gets created for your notebook, MINEO will establish a connection between it and your browser. This connection is encrypted and authenticated, so you can be sure that your code is safe. Also, context variables in a worker are only accessible for you.
Every time you open a notebook, a new worker session will be created. This means that if you open the same notebook in multiple tabs, each will have their own session, with their own worker and context.
Once you have successfully connected to a worker and it's ready to execute your code, you will see a status badge (Worker tag) with the worker name in the top right corner:

This same badge will show multiple states since you enter your notebook: It will display a Loading status when preparing the worker and a red Retry button to try again if the connection fails.
Worker images
This is useful when you have a set of dependencies you will use in multiple places, as it speeds the worker creation by avoiding installing the dependencies every time.
A worker has software and Python dependencies installed inside it. What's installed in your worker determines what you can run. When a worker is created, it is actually built as defined in its worker image, which is a snapshot of a machine with a certain number of files and software installed.
By default, all execution environments have the same MINEO base image, but you can create new images. You can select the default image for a notebook, a pipeline, or an entire project. This is useful if you have a set of dependencies that you want to use in multiple locations, as it speeds up worker creation by avoiding having to install the dependencies each time. Read more on Create custom Worker Images.
Additionally, you can install extra python packages with every execution. This is useful if you don't want to define custom images, and you don't mind the installation time in every execution. You can install a python package by using the following command in a Python block's code:
!pip install <package_name>
This pip install command works in the same way as in a terminal. Therefore, you can install packages from a specific version, or from a git repository.
Worker sessions
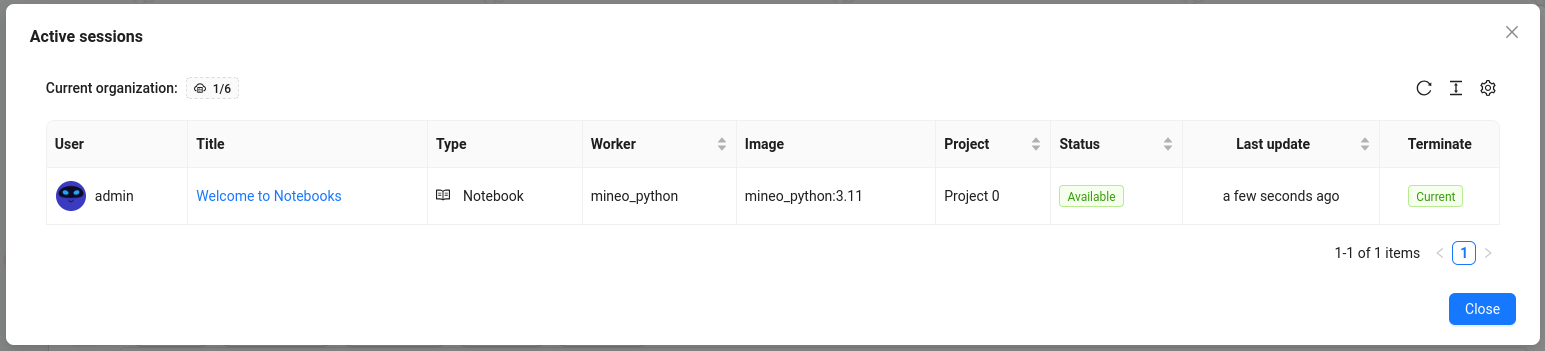
Each time you open a notebook, run a pipeline, or start a Live App, a new worker session is created. You can view all active sessions from any of the following:
- Sidebar: click the server icon next to your avatar (it shows the count when sessions are running), or open the user menu and select Active sessions.
- In a notebook: click the Worker badge in the top-right corner.
- In a notebook: Kernel menu > Manage Sessions.
The table lists each session's type, title and project, user, status, when it started and how long it has run, and, for running sessions, its last activity. The worker icon opens the machine behind it: worker name, image, CPU and RAM. Regular users see their own sessions; organization administrators see the sessions of every member of the current organization.
- Status filter — Active only (the default) shows the sessions running now; All adds the ended ones, and Finished only shows just those, with when each started and ended. Ended sessions are kept for a year.
- Date range — shows the sessions that were alive at some point in the range: started before it ends and not ended before it starts. It defaults to today, so every running session shows up whatever day it started. Shortcuts cover the last 7 and 30 days, this and last month, and the last 3, 6 and 12 months.
- Type filter — narrow the table to one kind of session: Notebook, Work, Live apps, Dev environments, Pipelines, Git or Worker image build. All types is the default.
- Limits — the header shows, with the same icons, how much of each of the organization's limits is in use: workers, Live Apps, dev environments and, when your plan includes it, Work sessions.
Click Finalize to end a session and free its worker; a confirmation warns that whatever the worker is running stops and anything not saved is lost. Administrators can also finalize other members' sessions — the confirmation names the session owner. Finalizing the session of a running pipeline cancels that execution. Every termination is recorded in the organization's Events as Worker session terminated, including who ended it and whose session it was. Notebook sessions may take a few seconds to disappear from the table after being finalized.
Context
Every time you execute Python code that creates a variable in memory, it will be stored in the worker's context. Once they are stored, those variables will be available to use in all blocks.
When executing blocks in a sequence the first time in a session, you need to make sure every variable is created before the block that reads it.
When configuring a notebook with widgets that read some variable from your context in a previous block, it's useful to execute those blocks before you configure the widget. That way, the app will help you by auto-completing with context variables you might want to use in different fields.
For example, if you execute a block where you create a pandas Dataframe, its name will appear as an auto-complete option when configuring a Table or Chart widget.
Context explorer
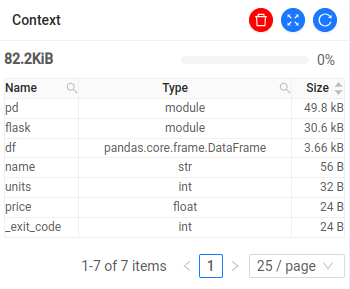
You can explore your worker's context in the 'Context' panel inside your notebook's sidebar. In the table header, you have three buttons:
- Clear: This will clear all the variables in the context and empty the worker's memory.
- Full screen: Open the context explorer table in a full screen, bigger version.
- Refresh: Refresh the context explorer table. The table will also refresh every time you open the sidebar panel.
Directly below there is the content size indicator, with the total size of the context in memory. It will also use a progress bar with the percentage of the memory used.
Once your worker's context starts to get full, some executions might fail because they have insufficient memory.
If this happens, you can clear the context to free some memory, search for memory-heavy variables to optimize them, or upgrade your plan to have bigger capacity workers.
In the table there are three columns:
- Name: Name of the variable.
- Type: Type of the variable.
- Size: Size of the variable in memory.
If you hover over a variable in the table, you will see its value.
Logs

Your worker's logs display display useful information about the execution, including custom messages that you can write yourself in the Python code. To open the logs window, click the 'Kernel' menu and then the 'Show logs' option.
In this window you can set an auto-refresh interval, a max lines limit and a reverse order option to get the latest log messages at the top of the window.
To clear the logs window, click the 'Clear logs' option inside the 'Kernel'.